- Clone remote repository
git clone "repository url"
- Git reset rebase
git rebase --abort
- Git abort merge
git merge --abort - Check status of commits
git status
- Revert last commit
git revert "last commit id"
- Check log of repository
git log
- Checkout branch
git checkout "branch name " -- example git checkout origin/abc
- Git reset code with Remote branch
git reset --hard
or with any origin branch
git reset --hard origin/branch
- Remove a file after push on remote repository.
git rm --cache /path/to/file
git commit -am "commit description"
git push
Migrate Android Application API to 28+
Google has updated their target Api’s from August 2019 and new applications must target 28+ and existing applications can use API level 26 up to November 2019.
as they have shared here in Link.
Now the problem is how to update existing application to the latest API.
here is my research, may be it can help you.
- add
android:usesCleartextTraffic="true" inside Android Manifest application tag
- It won’t allow you to start foreground service untill you start a notification on topbar which indicates that app is running in background.
Solution: Add permission in AndroidManifest.xml in Application tag.<uses-permission android:name="android.permission.FOREGROUND_SERVICE" />
- For the notifications of Service follow this link of stack overflow .
- Go to build.gradle and change your
compileSdkVersion = 28

and
targetSdkVersion = 28
- Update google related apis like support API to 28.0.0
- Add following code for Http Legacy in your AndroidManifest.xml application tag.
<uses-library
    android:name="org.apache.http.legacy"
    android:required="false" />
got any issues in Android ? approach me andtechies@gmail.com
Connect Android device remotely for debugging
Have you ever wondered how much you feel comfortable when you don’t have USB cables all over the development table and When your Android device is connected remotely.
I will tell you how to do it 😀
What you need to have for remote debugging.
- USB cable for only one time.
- Android device and your computer must be on same network.
- Android Adb in System path or Path of the adb mostly found in (sdk\platform-tools)
- Android SDK
Steps to connect your device remotely.
- Connect your device with USB cable with your computer.
- Give command adb tcpip 5555
- Now find the IP of your android device from settings.
- Give command adb connect IP:5555 example: adb connect 192.168.7.107:5555
- Disconnect your android device from USB cable.
- Start try to install application.
Please note that you can always connect the device by using step 4 after above step but once your device is restarted, You need to go through step 1.
Happy Coding 🙂
Install an apk like a google play store using ADB
Sometimes we have a scenario where we want to update our application like google play store update, for example: we have changed the DB configurations and we want to run upgrade our application.
Most of the time when app is installed through Android Studio, It uninstall previous application and re install new application so we can’t check the update scenario where app cache, preferences and DB is intact so how to do it ?
follow the steps below:
1. Open command prompt and make sure ADB is already in the path.
2. Open Apk directory where apk resides.
3. install Apk with following command:
“adb install -r test.apk”
Now you can see app is installed like a google play update with cache, preferences and db intact.
I hope you will like this info.
Why Android Studio Debugging is slow
I installed Android studio and it was working perfectly but with the passage of time it became very pain full with slow debugging.
I was like how that’s possible, Why debugging is very slow then I searched for the problem on google and stack-overflow and some one suggested that I have added many break points in my code so I tried to figure out what’s going on my Android Studio.
Then I removed all break points and then Android studio debugging is working like a charm.
You can try it on your Android studio and How to view all break points in the code.
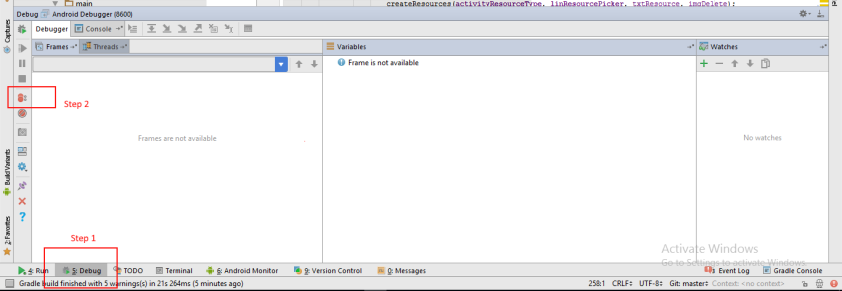
- Go to debugging settings in Android studio.
- Go break points as pointed below.
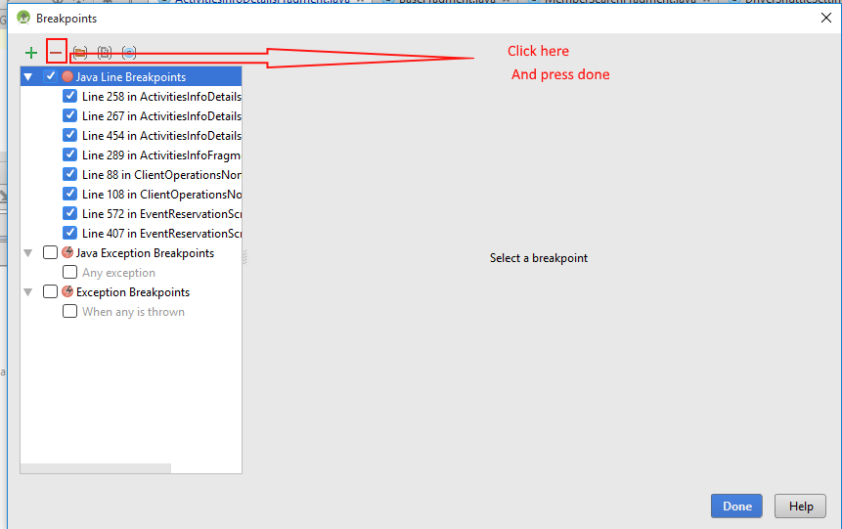
3. Remove all break points as shown below
Once you are done, you can check the speed of debugging.
Thanks
How to convert Retrofit 2.0 LinkedHashMap response to required object in Android.
Sometimes Retrofit 2.0 returns LinkedHashMap in response body and it creates problem for the new developers to parse this tree to object so here is the magic function that will convert any LinkedHashMap to required object.
public Object getObject(Object object, final Class type) {
    if (object == null)
        return null;
    Gson gson = new Gson();
    String gsonString = gson.toJson(object);
    Object objectToSend = null;
    final Class clazz = type.getClass();
    if (object instanceof ArrayList) {
        List<Object> objects = new ArrayList<>();
        for (Object objectA : (ArrayList) object) {
            gsonString = gson.toJson(objectA);
            objectToSend = gson.fromJson(gsonString, type);
            objects.add(objectToSend);
        }
        return objects;
    } else {
        objectToSend = gson.fromJson(gsonString, type);
    }
    return objectToSend;
}

Usage:
Abc abc = getObject(response,Abc.class);
Happy coding 🙂
How to convert any date string to required format date String in java.
Most of the developers, including me get irritated when they try to convert String date from one format to another so I am posting here the code snippet that I use for this functionality.
public String getFormattedDate(String date, String currentFormate, String requiredFormate){
    SimpleDateFormat formatActual = new SimpleDateFormat(currentFormate);
    Date dateA = null;
    try {
        dateA = formatActual.parse(date);
        System.out.println(dateA);
    } catch (ParseException e) {
        e.printStackTrace();
    }
    SimpleDateFormat formatter = new SimpleDateFormat(requiredFormate);
    String format = formatter.format(dateA);
    //System.out.println(format);
    return format;
}


usage :
getFormattedDate(date,"MMM/dd/yyyy","MM-dd-yyyy");
Happy coding 🙂
How to generate Array of time in Lapses using Java.
Recently I was working on a Android project and I had a requirement to pick a time in lapses for example time lapse is 20 minutes then my time picker was supposed to be.
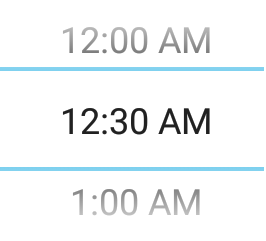
or in text it would be.
12 : 00 AM
12 : 20 AM
12 : 40 AM
and so on..
up to
11 : 40 PM
So I created the following function to get this done.
Below code satisfies above requirement.
private boolean isAm = true;
private String[] getTimeInLapses(int timeLapse) { // timelapse ex: 20 minuts

    int totalHours = 24;
    int totalMinutsInHour = 60;
    int divisions = totalMinutsInHour / timeLapse;
    int totalValues = totalHours * divisions;
    String[] array = new String[totalValues];
    int hours = 12;
    int negative = 11;
    boolean isAm = true;
    for (int i = 0; i < totalValues; i++) {
        for (int j = 0; j < divisions; j++) {
            array[i + j] = hours + ":" + (((j * timeLapse) == 0) ? "00" : (j * timeLapse));
            if (isAm) {
                array[i + j] = array[i + j] + " AM";
            } else {
                array[i + j] = array[i + j] + " PM";
            }
            //  System.out.println("Time: " + array[i + j]);
        }
        i = (i + divisions) - 1;
        if (hours == (negative + 1)) {
            hours = hours - negative;
        } else {
            hours = hours + 1;
        }
        if (hours == (negative + 1)) {
            hours = 12;
            negative = 11;
            isAm = false;
        }

    }
     return array;
}
Feel free to use this function or modify it accordingly 🙂
Retrofit Post call with field and body in Android.
Recently I faced a problem in while sending a request to a rest service using Retrofit android client. My requirement was to send a event_id and Event Object in a post call.
But problem was that, Retrofit doesn’t take @body with @FormUrlEncoded in post call so I tried to figure our how it will done through retrofit existing setup and here is the solution for this kind of request.
Retrofit configuration:
@POST("events/get-events/{eventId}")
Call<Response> getValidatedAttendee(
        @Path("eventId") String eventId,
        @Body Object object);
Now, How it works ?
I removed the @FormUrlEncoded annotation and moved eventId in post call and instead of using @Field in params, I used @Path and @Body param was same and it can be json object or any object.
for more info please follow official Retrofit squire website: http://square.github.io/retrofit/
How to convert Any Object to ContentValues in Android for Sqlite db insertion.
Below code will convert any object to ContentValues that can be used to insert into table.
Step 1: Create table with exactly same fields which object contains.
Step2: Use below code.
public void save(T t) {

    int id = -1;
    HashMap<String, Object> map = new HashMap<>();
    for (Field field : t.getClass().getDeclaredFields()) {
        field.setAccessible(true); // if you want to modify private fields
        try {
            map.put(field.getName(), field.get(t));
        } catch (IllegalAccessException e) {
            e.printStackTrace();
        }
    }
    ContentValues contentValues1 = new ContentValues();
    for (Map.Entry<String, Object> entry : map.entrySet()) {
        System.out.println("Key = " + entry.getKey() + ", Value = " + entry.getValue());
        if (entry.getValue() instanceof Integer) {
            contentValues1.put(entry.getKey(), (Integer) entry.getValue());
        } else {
            contentValues1.put(entry.getKey(), (((String) entry.getValue() == null) ? "" : (String) entry.getValue()));
        }
    }
    getReadableDatabase().insert(t.getClass().getSimpleName(), null, contentValues1);

}
